Sunday, November 23, 2008

Our Home - The Finest Masterpiece

Ladies and Gentlemen, may we present... our home...
---
After 2 months of make-over, our home is finally ready! Let us now invite you to a tour in our humble abode. We hope you find our place a little eye-pleasing. Enjoy!
---
Welcome!
(Foyer area and shoe cabinet)
- The Dining Area -
- Our Living Room -
Perfect for movie nights!
3-in- 1
(TV Feature cum Shoe Cabinet and Settee)
- Entrance to Sheppy's Empire -
The Kitchen
- A Very Well-Equipped Kitchen -


- Stand-Alone Kitchen Sink Mixer -

- Service Yard -

The base for our washing machine turned out pretty well.

- Guest Room -

- Study cum Music Room -

- The Common Toilet -

- Entrance to the MBR -

The steps on the right leads to our sleeping area.

- Starry Starry Nights -

- Beloved Restroom -

Literally, a room where we can rest in!

It looks just too good not to stay longer in it.

---

That's all, Folks!

- Missing Pieces -

Well, what can I say?

Due to our excitment, we found that we had left out some 'reno progress pictures' since the last photo update. We even promised to upload pictures of our completed reno supposedly in this post....

So we apologise for not being able to do that just yet, until you see these updates. Let's get this set of pictures over and done with, so you can see the REAL pictures.^_^


Capentry works in our kitchen for the cooker hood and hob.
Capentry works for the sink.


Wardrobe for the guest room.
Nice brown laminate with an interesting stony texture.


Our big wardrobe for the MBR. And, I mean BIG.

MBR toilet. Vanity cabinet and the area for our mirror.
---
Yup, that's it! Cheers!

Tuesday, November 4, 2008

Panic

- less!

It had been a busy one month for both of us at work and we realised that we had not posted any updates here for exactly a month now.

Thinking back, all we did over the past month was to shop and work, and shop, and work. Hmmm... haven't really thought about reno have we? I guess thats a good thing.

Just a couple of days back, we decided to call our ID to ask about the status of our reno. The last time we spoke, most of the stuff were already up less the works in the kitchen. To our surprise, he said everything was done up and is pending our 'vetting'. So we went down to our unit to take a look. Equipped with a pen, a piece of paper and a roll of paper tape, we went around the house hunting for 'defects'.

No major faults to report, except that the perfectionists in both of us listed down 30 'could be done better' improvements. These include the likes of removing paint marks behind the doors and reducing the gaps between the cabinet doors. After reporting the minor stuff to ID, he said he would personally go down to our place to take a look and see if he could figure out what we wanted him to rectify. Oh, we accidentally took the paper with our 'improvement list' home -_-

An hour later, he gave us a call and said something like, "Lets meet tonight, I'll get all my guys up to settle everything!" We thought siao liao, big issues.

That evening, we proceeded to meet him at our place. Yah, really all his guys. Himself, his team of capentry workers and his project manager was on site to rectify everything!

Kudos to his team as there was one particular improvement where i wrote on our the paper as a guide: " settee laminate not aligned???", where the joining part of the laminate at side of settee and the TV feature wall did not align (was about 1mm protruding). When we arrived at the scene, his guys already took out the setter and re-positioned it to fix the alignment problem. I mean, we can live with that, but he got his guys to fix it even without us mentioning it. Thats what I call professionalism. ^-^

Guess what?

That marks the end of the renovation!
ID told us to look for him if there were any other outstanding issues and shared some maintenance tips on how we can keep the capentry and other stuff in good condition. With that, we shall head down to our place again this weekend to take some pictures to keep you guys updated on how our place looks like!

-Stay Tuned!-

Friday, October 3, 2008

How Many Items can a Bomb be Traded for?

Well, 26 to be exact. We traded the bomb shell we found at the playground behind Sheppy's place for 26 lighting pieces as installed below:

The common downlights and T5 cove lights.

A regular rectangular light for the kitchen.

Another variant of the rectangle shaped lights for bedroom 2 and 3.

The infamous 'hum bao bao' (lit. Hamburger) lights for the Common Bathroom, Service Yard and Household Shelter.

A more unique light piece for the MBR.

Spurged a little on ourselves. hee.


A squarish piece for the wardrobe area. It has a black backing to match the MBR light piece above.

A headlight look-a-like piece in the MBR toilet.

-+-+-+-+-+


*drumroll*


And, the finale, taking the centrestage is ...


*more drumroll*

- A Masterpiece for the dining Hall -

Picture taken with surrounding lights switched on.


Requested for surrounding lights to be switched off.

-+-+-+-

We hope you like the lights as much as we do!

Freshly Grilled

Windows and Grills. Safety features for mild acrophobics, especially so with the platform in the MBR and the close proximity of our sofa to the window (intended placement; to be featured when the sofa is materialised).

Well, since all window grills look alike, 1 picture should suffice.

3 colossal window panels were erected in the Service yard. Grills would be up at a later date as measurements had to be taken.

...
The next update would tickle your fancy.
Lights! Lights! And more lights!

Colours. The Personality of Space. Our Space.

Here's an update on the 2nd major progress of our flatfor the week. The first coat of paint was applied to the entire apartment, allowing us to have a feel of what it'll look like after the colours are up. Each picture should comprise part of the ceiling, which is painted white, and the wall with the chosen colour. This way, the colours should stand out more clearly visually. Go ahead, feast with an open mind (just try your best not to copy our colours, if possible). Cheers!
-----
Off-white was the theme of the living room area while a light hue of grey was chosen for the foyer area.
We decided to extend the grey colour into the dining area to project a warmer feel.

Bedroom 2 aka Guest Room was given a vibrant splash of brown. This is a challenging colour to match, so watch out for developments in this room!

On a side note, I was asked a couple of times why didn't we pick an 'easier' colour like blue or white? My question back was 'Why blue'? Our intended replies were similiar - silence.

An energetic burst of zesty yellow for Bedroom 3 aka Study/Music rm.

I've read that yellow stimulates the creativity of the mind. Mmm...

Last but not least, a browny-grey hue gives the MBR a cosy feel, condusive for sleep and more sleep. z Z z ...

Yes, you would have noticed by now. No white. What? Why didn't we chose white?

...

Peek-a-Boo!

The long awaited update! A couple of progress over the last 2 weeks. Lets start with the MBR!

A couple of weeks ago, our newly tiled MBR floor (see the wet cement on the skirting) was vandalised with marker ink! Some funny fuzzy signs were drawn and scribblings were observed...

Woot~! This was what the scribblings and signs were for! A designated area for our wardrobe. No no no, i know what you're thinking. Nope, its not a walk-in-wardrobe. Just a normal one with sliding doors...

And, the platform where our mattress will eventually rest on. Ooo... this area is oozing with cosy-ness...

Super bowl is back! White as ever.
...
Next up, paint ball maniaaaaa!

Tuesday, September 23, 2008

LO AND BEHOLD!

As promised! Back with more pictures (lots of them in fact)! The tilings are completed!

Just to note that we had kept these pictures for a while. Check out the renovation milestones at the bottom of this page to see when the reno works were completed. I'll cut the story short and let the pics speak for themselves.

Enjoy!

Mr Nice Guy laying the tiles for our foyer. Yup, tiles, not timber planks, not laminates. Plain, old, trusty tiles that look like wood. Kudos to their excellent worksmanship. Cheers!

Tiling in the living room has been completed. The Contractor's bench makes a good substitute for our sofa (for now at least).

Completed work of the Living Room area (with skirting) and the Foyer.

Homogeneous tiles for all bedrooms as well. The air con trunking can be seen on the left just beside the aircon ledge's window.

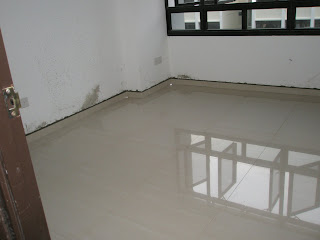
Tiling completed in the rooms. Very reflective. nice light distribution in the day.


A clearer view of the air con trunking. Starts from the aircon ledge, enters the MR and heads up to the ceiling (passing through to bedroom 2).

Aircon trunking from the MBR joins the rest of the tribe at the top corner of Bedroom 2. Like a river, it then splits towards two directions. To the left, it connects to the aircon unit for Bedroom 2 before being linked to the aircon unit in bedroom 3 (thru a wall). Both aircon units are located above the door. To the right,it will be linked to the aircon unit located in the MBR. This way, the trunkings will not be visible in the MBR.

Phew, that was long. I hope you get what I was trying to say.

Another perspective.


Kitchen bases for the cabinets (hanging ones, not the full length kind) and the fridge (below the pails).


Across what you saw in the previous picture, lies another set of cabinets that would hold the kitchen sink.

Decided not to have top cabinets as it would make the kitchen feel even smaller.

Concrete base for the washing machine. No idea why it was constructed this way. I reckoned that it was a design feature (hell yeah! we paid for this man!) since it's different from the conventional method where the contractors would just cement the whole area in a traditional kind of way (the entire length of the service yard).

Who knows?

Totally cool! The overlaid toilet (just completed; still unwashed)!

Black tiles with running tone. A little bit of grey, some shades of blue and a great bunch of facination and joy.

Shower area, showing the colours more clearly.


I hope you enjoy these pictures. The next step of our reno work would be the painting of the apartment and the putting up of a false wall in the MBR for our wardrobe.

Till then, ciaos!

- Renovation Milestones -

  • 03 Nov 08 - Reno completed! Hand over!
  • 27 Oct 08 - Kitchen Carpentry completed
  • 20 Oct 08 - TV Feature Wall completed
  • 16 Oct 08 - Painting completed
  • 11 Oct 08 - MBR Wardrobe completed
  • 11 Oct 08 - MBR Toilet cabinet completed
  • 10 Oct 08 - MBR Platform completed
  • 08 Oct 08 - Shoe Cabinet/Settee completed
  • 08 Oct 08 - Bdrm 2 Wardrobe completed
  • 03 Oct 08 - Lightings installed
  • 30 Sept 08 - Window Grills up
  • 22 Sept 08 - Tiling completed
  • 21 Sept 08 - Toilet Overlay completed
  • 20 Sept 08 - Kitchen Bases completed
  • 12 Sept 08 - False Ceiling completed. Reno officially starts.
  • 10 Sept 08 - Aircon Trunking completed, Sand and Tiles delivered
  • 08 Sept 08 - Reno Loan approved